
As I mentioned in my previous post about Abby Glassenberg’s book Stuffed Animals, From Concept to Construction, I tested several patterns of the book before its release.
How did that happen, and why did I want to do it in the first place?
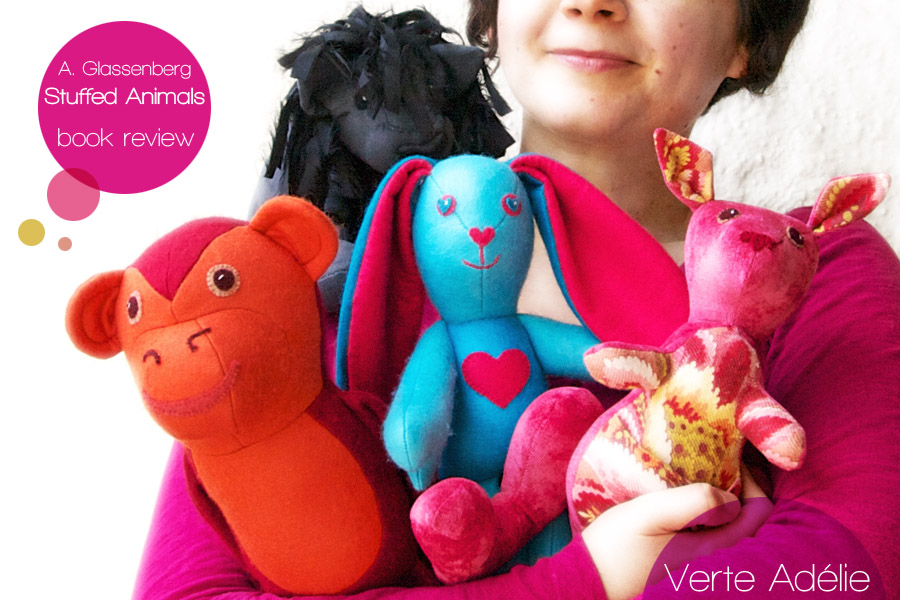
It happened very simply: I answered one of Abby’s tweets calling for testers, sometime in 2011. She sent me the pattern for the bunny, with the written instructions, the corresponding lessons and a few pictures, and since I had free time, I told her I could test more animals if needed. The result is the whole menagerie visible above: after the bunny came a lion, then a kangaroo, and finally a monkey.
As for the reasons why I wanted to do it… Well. Let’s say I had unresolved issues with some previous stuffed animals that crossed my path. No, Patrick, of course I’m not talking about you! When I designed my fairy tale inspired jewelry collection, the frogs and mice got me especially frustrated: I couldn’t do what I had in mind, because I didn’t really know how to make a gusset work. I didn’t even actually know it was called a gusset. I had no time to figure it out back then, but always thought I would try again, eventually, just for the sake of knowing. Which I did: a few years later, I started hand sewing stuffed animals from japanese books in order to learn more, and it was not so long after that that Abby asked for help. Great timing: I could learn some of those techniques I was curious about, while helping a fellow maker who was writing a book! Plus, having deadlines is good, if not essential, for my productivity. A win-win-win situation.

How did I approach the testing?
I made a VERY conscious effort to actually follow the instructions. Does it sound obvious? Perhaps, but I know I’m generally not good at following instructions (especially the written ones, as I prefer pictures or technical drawings), so I had to be very careful about that. I really wanted my feedback to be valuable, of course, so I read everything. Carefully, and very closely. And I traced the pattern pieces exactly as they were, without tweaking anything. Attagirl. I took liberties with two things, though: fabric choice and facial features. I made sure with Abby that it was OK if I only used what I had on hand, even if it didn’t match the type of fabric she recommended. I didn’t buy anything (no fabric buying? another remarkable effort of will!), so this testing thing also worked as a stash buster. Another win. Also, I improvised most of the facial features rather than following the directions. And the great thing I learnt from those last two points is that it doesn’t take much effort to make one of the animals more your own: even if you follow the pattern exactly, different fabric choice and facial features already make a dramatic difference in the final result. You can check the pictures below, as I added pictures of Abby’s designs side by side with my own tested versions.
Things I learnt: three general rules to keep in mind
I feel like I’ve learnt a ton of new things after making the four animals from the book, but if I had to create my own boxed text with a few essential elements highlighted (and preferably written in big, bold letters), here’s what I would say:
Don’t forget to cut one, then reverse one. This is by no means a revolutionary concept. When you sew clothes, you also have to mirror a lot of the pieces, right? So don’t ask me why I insist on the importance of this one. You can always try to guess how many times I forgot to reverse a piece before cutting, but I won’t tell you how close you are from the truth. Shorten your stitch length. If you want to be able to stuff firmly without seeing the seams cracking open in random places, you really have to use a shorter stitch length than you would normally use on your sewing machine. You will always need more stuffing than you think (and when you think you’re done stuffing, stuff more). OK, that’s the only thing I had to buy. I thought the big trash bag full of stuffing I already had would be more than enough for many animals, but I was wrong. I did mention my surprise to Abby, and even suggested her to add a picture of a finished animal side by side with the (big) amount of raw stuffing necessary. I have no idea if this was in her plans from the start anyway, but I admit I grinned when I saw there was indeed a picture like that in the book (“hey, look! I think that’s me!” – yes, we’re all only humans, aren’t we?). Stuffing is an operation that requires patience. You have to add it little by little, and even when you think you’re done, you can generally add some more. That being said, let’s say a few words about those animals I made, now.My favorite: the pink kangaroo
Oh, kangaroo, I love you, especially your cheerful association of pink and bright pattern! The pink is a leftover of home decor fabric, and the patterned one is vintage. If I remember well what the seller told me when I bought it at a flea market in Paris, it was a very common pattern in the beginning of the 20th century, but in a brownish colorway, this bright version being far less common. She also said she bought it from a convent who used it as a curtain: what a weird destiny for a piece of fabric, from convent curtain to cute kangaroo.
This is probably the favorite technical detail I learnt: see how the leg is neatly and strongly attached to the body? I found it hard to visualize how it worked, but was thrilled once I saw the result. The method is explained in the lesson 44 of the book, and here on Abby’s blog. Apart from that hard to visualize technique, I found this kangaroo surprisingly easy to make, time-consuming, but not that challenging. Oddly enough, I struggled more with the joey!


The simple bunny that taught me valuable lessons
Confession: when I got the bunny, I didn’t think it would be especially complicated, but since it was my first, I quickly got humbled. I was surprised by the way the legs were attached to the body, and figuring out how to attach the head wasn’t that simple either – once I understood, it got much better, but it still took me a little time to figure the obvious, ie that I had to hold my needle horizontally and not vertically! The recommended fabric was felt, so all I changed was the color, and I really like this association (and the heart I added). I also made a tail out of felt, since I didn’t have yarn to make a pompom.


Monkey see, monkey sew (the arms upside down)
Guess why one of the steps in the monkey instructions mentions “check to make sure the thumbs are pointing upward”? Do you think it’s because a silly tester realized the arms of her monkey were upside-down only once they were strongly attached to the body? (Rolls eyes and shake head). I really like the tail and the hands (you have to stay focused when sewing those), but I needed a good amount of fabric for this one, and since I only used the felt I had on hand, I’m not completely fan of the colors I had to choose. Still, it’s a cute and huggable little guy.


How I fought with a lion
Apart from a few details, the three animals I just showed look rather good, when you think I was testing techniques I didn’t know. So now, let me introduce you to the lion, in the unfortunate role of the Ugly Duckling. Oh, how I struggled with this one! The muzzle is sewn too low. All my attempts at turning the tail right side up failed, so the poor creature remains tail-less. And finally, for a reason I ignore (grainline problem, with that thick, faux suede fabric?), one of his back legs is all crooked. But at least he has a funky silk mane (yes, silk!) that makes him look like a lion version of Bob Marley.


Random remarks in conclusion
It is interesting to notice that the patterns were actually tested! If you think it’s perfectly common and normal, read this post (and the comments) on Abby’s blog: apparently, it’s more of an exception. In an ideal world, the patterns would be tested once the book is almost in its final form and just before printing, but since there are too many constraints to make it sound realistic, having testers during the writing process is the best that can be done. There’s one thing I shouldn’t even admit I enjoyed in the process. Being a tester is one of those rare occasions when pointing typos or various grammatical errors doesn’t make you sound like a pontificating dork (“and here, it should be its, not it’s”) and is even considered helpful. I normally refrain from doing it, so I like that… she says, pushing her glasses up onto her nose with a slightly embarrassed smile. The first rule of being a tester is you do not talk about being a tester. Or more accurately, you can say that you are, but that’s about it, and that’s why I had to refrain from sharing any picture of those animals for almost 2 years. I don’t have problems keeping a secret. The kangaroo, on the other hand, was hopping up and down with impatience to make a triumphant debut in society (which is only natural, when you think about it). Is secrecy necessary to sell craft books? This is exactly what Abby wonders, since the required secrecy wasn’t her idea. Have you noticed a real animal sneaked into some of those pictures? Related question: is “Photobomber” the secret middle name of every single cat on the planet? The cutest pattern of the book, apart from the kangaroo? I’d say it’s the ram. Look at that!
And after all that, finally, I have a much better understanding of how those things work. Achievement unlocked. Thanks Abby for trusting me!
Same disclaimer as in the previous post: I was sent a free copy of this book, but all the opinions I share here are of course my own.
Qu’est-ce qui m’a donné envie de me proposer ? Lorsque j’avais créé ma collection de bijoux textiles inspirés par les contes de fée, j’avais été assez frustrée par la souris, et encore plus par la grenouille (voir photo plus haut). Je ne savais pas vraiment comment créer un gousset, et je n’avais pas le temps de creuser la question à l’époque. Ce n’est que quelques années plus tard que j’ai essayé d’en apprendre un peu plus en cousant à la main quelques animaux issus de livres japonais, et c’est à peu près à la même période qu’Abby avait besoin de testeurs. Quel timing ! J’allais pouvoir aider quelqu’un, et apprendre en même temps des techniques que j’étais curieuse de découvrir. Le tout avec des dates butoirs, ce qui est bon, voire essentiel, pour ma productivité.
Je savais que pour faire des commentaires vraiment utiles, j’allais devoir faire un effort conscient pour *lire* les instructions, et non simplement les survoler comme j’ai l’habitude de le faire ! J’ai également sagement décalqué les pièces de patrons telles quelles, sans chercher à les modifier (oui, cela a représenté un certain effort).
Les seules libertés que j’ai prises, c’était d’utiliser du tissu que j’avais sous la main, et d’improviser les yeux, nez et “bouches” de toute la ménagerie. Ce qui m’a permis de me rendre compte que ces deux éléments font déjà une énorme différence dans le résultat final, et sont un premier moyen très simple de créer une version plus personnelle des animaux du livre.
Parmi les choses essentielles que j’ai retenues :
– ne pas oublier que le sens de certaines pièces doit être inversé avant de découper, sous peine de créer 2 côtés gauches, par exemple (oui, j’ai fait l’erreur un certain nombre de fois).
– il est essentiel d’utiliser un point plus court que d’habitude sur votre machine à coudre, sinon, vous allez voir les coutures s’écarter ou même se déchirer par endroit au moment du rembourrage.
– vous aurez toujours besoin de plus de rembourrage que vous ne le pensez, et même quand l’opération semble terminée, il est possible qu’elle ne le soit pas vraiment.
Mon test préféré : le kangourou
Oh que j’aime ce kangourou, en particulier ses couleurs ! Le tissu rose est un reste de tissu d’ameublement, et le tissu à motif a été acheté aux puces à Paris. Si je me souviens bien de ce que m’avait dit la vendeuse, c’est un motif typique du début du 20e siècle, et elle a racheté ce tissu à un couvent où il servait de rideau. Drôle de destin pour une pièce de tissu, du couvent au kangourou rose ! C’est avec ce patron que j’ai appris le détail technique qui m’a particulièrement frappée : vous voyez comme la les pattes arrières sont proprement et solidement attachées au corps ? Vous pouvez avoir un aperçu de la méthode employée sur le blog d’Abby. La technique est un peu dure à visualiser, mais le résultat est assez bluffant. À part cette difficulté, ce kangourou m’a paru étonnamment facile à faire (mais long, quand même). Curieusement, c’est la mini marionnette / bébé kangourou qui m’a posée plus de problème !
Un simple lapin qui m’a pourtant appris des leçons
Lorsque j’ai reçu ce patron, je me suis dit que ça n’allait pas être bien compliqué : erreur. C’était le premier, et j’ai appris bien des choses, notamment sur la façon dont les pattes et la tête sont attachées au corps.
Le singe qui avait les bras à l’envers
On se demande pourquoi le livre recommande explicitement dans les instructions de veiller à ce que les pouces pointent vers le haut au moment de l’assemblage des pattes avec le corps. Serait-ce parce que la testeuse de ce patron aurait attaché les pattes à l’envers ?… Je trouve ce singe assez charmant dans l’ensemble, mais il demandait pas mal de tissu, et comme je commence doucettement à voir le bout de mes ressources en feutrine (ça veut dire que je vais pouvoir en racheter ?), j’ai dû piocher des couleurs qui ne me convainquaient pas complètement.
Comment je me suis battue avec un lion
À quelques détails près, je trouve ces animaux pas si mal réussis, quand on sait que les techniques étaient nouvelles pour moi… mais je vous présente le lion, et le roi de la jungle joue ici le rôle du Vilain Petit Canard ! C’est le seul avec lequel j’ai vraiment bataillé. Son museau est cousu trop bas, toutes mes tentatives de remettre la queue à l’endroit sont restées vaines, et, cerise sur le gâteau, je ne sais pas si c’est un problème de droit fil avec mon tissu imitation daim, mais il a une patte arrière complètement de travers. Heureusement, il lui reste une crinière en lanières de soie qui lui donne des faux airs de Bob Marley (version lion).
En vrac et en conclusion
Il est intéressant de noter que si je relate mon expérience de testeuse, c’est bien parce que ces patrons… ont été testés ! Apparemment, c’est bien moins fréquent qu’on ne le pense, comme l’explique Abby dans ce post de blog.
Confession peu glorieuse : j’ai beaucoup aimé me retrouver dans une situation où relever des erreurs d’orthographe et de grammaire étaient non seulement toléré, mais même utile !
La première règle du testeur, c’est de ne pas parler des testeurs. Ou plus exactement, lorsque vous testez des patrons pour un livre, on va probablement vous demander de garder le secret. Parfois pendant 2 ans, comme c’était le cas ici, et ce n’était pas du fait d’Abby.
Avez-vous remarqué qu’un vrai animal s’est immiscé sur certaines de ces photos ?
Et si je devais choisir le patron que je trouve le plus joli, à part le kangourou ? Je voterais pour le bélier !
Même avertissement que pour mon article précédent : j’ai reçu une copie gratuite de ce livre, mais toutes les opinions exprimées ici sont évidemment les miennes.


Verte Adelie | Stuffed Animals, by Abby Glassenberg (part 1): a book review, and a general plea for useful and usable craft books
Jul 1, 2013 -
[…] I had never published a book review on my blog until today, which probably explains why a lot of general considerations crept into my draft, that became so tentacular I ended up splitting it into two posts: the one you’re currently reading is a general review in which I digress and ramble about craft books, their usefulness and their usability. The second talks about the book through my experience as a tester, the animals I made, and what I learnt from it (you can now read it here). […]
Vanessamakes
Jul 3, 2013 -
I bought the book based on your glowing review and I’m starting to make a hippo for my son! Your kangaroo is my favorite too. I think I will have to make a kangaroo friend as well. Thank you for such detailed information in this fantastic book!
Jean
Jul 6, 2013 -
Wow! I can only dream of ever mustering enough patience to make these amazing stuffed animals! Your versions — all of them! — are just adorable. What a thorough review of the book. And yes, photobomber is the middle name of every cat on this planet!
Verte Adelie | Wire and fabric: Jasper the Dog
Mar 12, 2015 -
[…] he was a cat in a previous life? Or maybe a distant relative of my pink kangaroo. In any case, he looks so […]
Verte Adelie | A pink kangaroo in colored pencil Photoshop brushes
Aug 27, 2015 -
[…] with pencil brushes this time. The pink kangaroo I chose to draw is a soft toy I sewed when I was a tester for Abby Glassenberg’s book, it’s been living on a shelf in my studio ever since. Oh, that flowery fabric I used for the […]
Verte Adelie | Watercolor and gouache bunny, Photoshop only
Sep 3, 2015 -
[…] soft toy I sewed while being a tester for Abby Glassenberg’s book, and an experiment with Photoshop brushes: this week’s project was almost the same as last […]
Karl Wetherspoon
Apr 12, 2020 -
Greetings, I was just taking a look at your website and filled out your feedback form. The feedback page on your site sends you these messages via email which is the reason you’re reading through my message right now right? That’s the most important achievement with any type of online ad, getting people to actually READ your message and this is exactly what you’re doing now! If you have something you would like to blast out to lots of websites via their contact forms in the U.S. or anywhere in the world let me know, I can even focus on your required niches and my prices are super low. Shoot me an email here: trinitybeumer@gmail.com
Alexis
Nov 3, 2020 -
Google, Bing, Yandex, DuckDuckGo.
Dawn Queen
Jan 4, 2021 -
There’s nothing more annoying than watching a video with a terrible audio track – tinny sounding, bad volume and you struggle to get what is being said… But even WORSE! Text To Speech! Those terrible Text To Speech audios on videos that sound fake, emotionless, robotic and cheap! Makes me hit the Back Button every time. So what can you do if you don’t have a nice voice for your own or your clients videos? You pay somebody to do it for you, and that ain’t cheap! There was no real alternative…UNTIL NOW!. To hear a free demo now. Write a reply here: nancyfadodd@gmail.com
Margie Hislop
Jan 23, 2021 -
Did you know that messages that come through on your website contact form are in effect a highly effective way to get more sales for your business? How can we do it? Easy, we put together an ad message like this one for your site and we blast it out to hundreds of thousands website contact pages on any kind of website you want. Do ads like these work well? Well you’re reading this now aren’t you? The awesome thing is, this doesn’t cost more than a hundred bucks a month! Want to find out more? just send a quick message here: ErnestLilliana57358@gmail.com
COHERITORS
Feb 7, 2022 -
This may influence which merchandise we write about and where and the way the product appears on a web page.
DIECIOUSLY
Feb 9, 2022 -
We can’t all be the host of the Joe Rogan Experience, however there are still loads of popular podcasting niches to participate in.