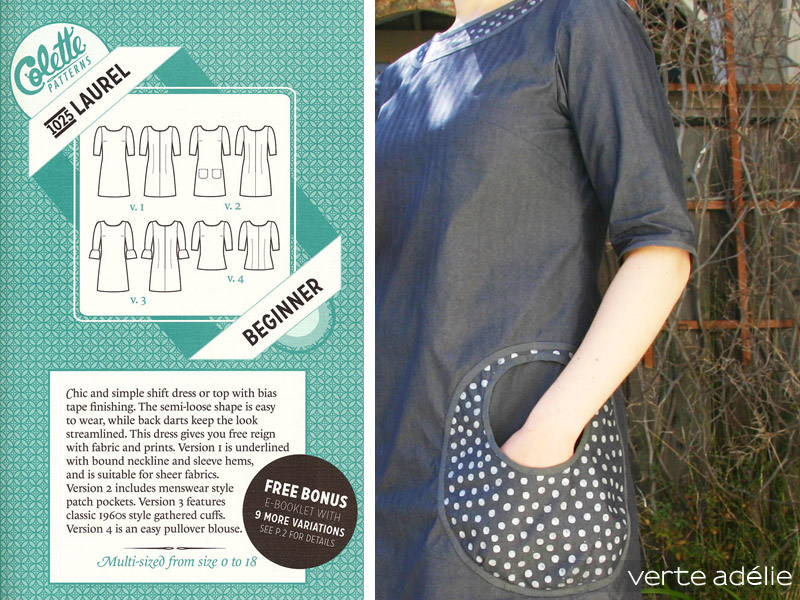
A few weeks ago, the indie Portland-based pattern company Colette launched Laurel, a simple shift dress pattern. To be honest, my very first reaction wasn’t enthusiastic, but a few hours after the launch, I had completely changed my mind and bought it. And then they announced a Laurel contest, and my head just burst with ideas of alterations, most of them involving pockets, the craziest involving making a jacket. Wouldn’t that be great? I would make several Laurel, get tons of new funky stuff in my wardrobe, and participate in many categories of the contest for the fun!
Needless to say none of this happened, and the process of making the single dress I show here was humbling. Which was obviously a much needed return to reality, wasn’t it? So let’s talk a little about the making of this dress.
(La traduction française se trouve en toute fin de l’article).


Four muslins (and counting). Just because a pattern is simple, and this one really is, doesn’t mean it will fit you. I made four muslins (= drafts), if you count the first one that was wayyyy too big (I then re-cut the pattern a whole size smaller, in 6), and the fourth that was supposed to be a wearable muslin but was quickly propelled into the unwearable category after an unfortunate serger knife incident (yay, I finally got a serger, and this was my very first project using it). Yep, the learning curve is steep.
Zipper or not zipper? The good thing about those muslins? I practiced sewing invisible zippers. Until I realized I could actually put the muslins on without opening the zipper, so I skipped that step for this dress. It works, but a more fitted version with zipper would probably look more flattering.
The dreaded armhole/sleeve area. I couldn’t move my arms in a comfortable way, so I tweaked things here and there in the most unscientific manner, widening the sleeve, using the cut-on gusset technique on top of it (I learnt in this great Craftsy class with Lynda Maynard – yes, I’m addicted to Craftsy sewing classes), and lowering the armhole a little. It made things much more comfortable, but as you can see on the first picture, the sleeves insertion was far from perfect, and I’m not sure I got a very accurate idea of what to do the next time I have a problem of that kind, because I changed too many things at the same time.
The gaping upper back, near the neckline. It’s not really visible on the pictures, but believe me, it’s there. I never managed to fix this, and have no idea how to do it. Darts? Or perhaps I should have cut a smaller size for the back? The back darts area also look better on the picture than in reality, and I wonder if a sway back adjustment would help. Not that I would know how to do it either.
The added details: two pockets and a facing. I drew a facing for the neckline, and attached it to the exterior of the garment as a decorative element. I also drafted two round pockets (no, those are not baby bibs), and struggled to give them enough volume to be usable (in the end, I used three tiny darts), but not too much volume, because who needs extra volume in that area? I finished both the pockets and facing with the same home made bias I used to finish the sleeves and hem. Let me tell you, that’s a lot of bias, so I must thank profusely the person who generously lent me her bias maker, it saved me a lot of time and burnt fingers!
The fun part: the home made polka dot fabric! One of the category of the contest was “self designed fabric”. I didn’t have enough time to have a pattern printed by Spoonflower, so I tested all kinds of methods to add motifs on fabric (fabric markers, stamps, Sharpie…). I ended up using airbrush paint (silver mixed with a little black) that I applied on the same fabric as the dress with a q-tip, and I like the result. It reminds me of that Nani Iro fabric.


In conclusion, ruining fabric is the only way to learn
I think I had something delicately japanese in mind when I chose this beautiful blueish-grayish lightweight denim in my stash (still too heavy for a dress? it would probably look better as a skirt or pants?) in association with polka dots, but I find the result on me rather… frumpy. I blame my lack of proper fitting skills more than the pattern itself, though, so I wouldn’t discourage anyone from buying it, it really is a great canvas for all kinds of experiments: just have a look at some of the amazing things people made out of it in the Colette Patterns Flickr group!
I’ll also listen to Kenneth King when he says perfectionism is a disease, and that you should be willing to ruin some fabric and waste some time on garments you’ll throw away in the end if you ever want to learn. So even if I consider this dress as a fifth muslin that may not see a lot of the outside world, I learnt new things while making it, and I’m happy I finished it rather than tossing it in my “for the day I get the courage to have a second look at it” box. Plus, painting my own polka dot fabric was kind of rad. Never underestimate what you can do with a little paint and q-tips.
Version françaiseIl y a quelques semaines,
Colette Patterns, une compagnie indépendante basée à Portland, a lancé son dernier patron en date,
une robe appelée Laurel. J’avoue que ma toute première réaction a été mitigée, mais mon avis a rapidement changé, et quelques heures après le lancement, j’avais acheté le patron. Peu de temps après, Colette
a annoncé un concours autour de cette robe, et je me suis mise à imaginer toutes sortes de variations incluant pour la plupart des poches diverses et variées, mon idée la plus folle étant de transformer la robe en veste. J’allais remplir mon placard de plein de nouvelles choses chouettes, et participer au concours dans plusieurs catégories, youpi ! Puis vint le dur retour à la réalité et à un peu plus d’humilité. Voilà ce que j’ai en fait réussi à faire : une robe.
4 toiles. Ce n’est pas parce qu’un patron est simple qu’il va forcément vous aller. Combien de toiles (= brouillons) ai-je fait pour cette robe ? Quatre, si on compte la première qui était trois fois trop grande, et la quatrième sensée être une toile portable, devenue importable en un coup de couteau de ma surjeteuse toute neuve (encore un apprentissage en cours…).
Fermeture éclair or not fermeture éclair ? Voyons le positif, j’ai profité de ces brouillons pour m’exercer à la pose de fermeture éclair invisibles. Jusqu’à ce que je m’aperçoive que j’arrivais sans trop de problème à enfiler la robe brouillon sans même ouvrir ladite fermeture éclair. Autant dire que je ne me suis pas amusée à en ajouter une sur cette dernière version, mais je suppose qu’une version plus ajustée (et avec fermeture éclair) serait plus flatteuse.
La zone tant redoutée : emmanchures et manches. Le brouillon n°2 m’a montré que je n’arrivais pas à bouger mes bras confortablement, donc je me suis livrée à toutes sortes de bidouilles (il n’y a pas d’autre mot), élargissement de la manche, ajout d’un gousset compris dans la manche (une technique apprise sur Craftsy dans la classe de Lynda Maynard – oui, je suis accro aux cours de couture – payants et en anglais – proposés par cette plateforme), et emmanchure rabaissée d’un centimètre. Le résultat est beaucoup plus confortable, mais je ne peux pas dire que je saurai exactement quoi faire la prochaine fois que le problème se présente.
Une encolure qui baille dans le dos. On ne le voit pas bien sur les images, mais croyez moi, ça baille sec, et je n’ai pas la moindre idée de la façon de régler ça. Des pinces, peut-être ? Ou carrément couper une taille de moins pour le dos, sachant que la partie pinces reste assez flottante également ? À moins qu’un ajustement dos cambré soit nécessaire. Si c’est le cas, encore quelque chose que je ne sais pas faire.
Les détails ajoutés. J’ai dessiné une parmenture pour le col, que j’ai choisi de coudre sur l’extérieur de la robe en guise de décoration. J’ai également brouillonné deux poches circulaires (non, ce ne sont pas des bavoirs de bébé…), et me suis grattée la tête un moment pour réussir à leur donner suffisamment de volume pour qu’elles soient utilisables, mais pas trop de volume non plus, parce que franchement, qui a besoin de volume supplémentaire dans cette zone, mh ? J’ai fini les poches et la parmenture avec le même biais maison que celui des manches et de l’ourlet, ce qui, croyez moi, représente une sacrée quantité de biais, donc mille mercis à la personne qui m’a prêté sa machine à faire du biais, me permettant de gagner un temps considérable (et d’éviter de me brûler les doigts avec le fer) !
Des pois, des pois ! L’une des catégories du concours était “tissu que vous avez dessiné vous-mêmes”. Je n’avais pas assez de temps pour faire imprimer quelque chose en ligne, donc j’ai testé toutes sortes de méthodes (marqueurs à tissus, marqueurs tout court, tampons…) pour créer des motifs sur le tissu. Au final, j’ai utilisé de la peinture pour aérographe (un mélange d’argenté et de noir), appliquée tout bêtement avec des cotons tiges, et je dois dire que j’aime beaucoup le résultat, qui me rappelle ce splendide tissu Nani Iro.
En conclusion : “gâcher” du tissu, la seule façon d’apprendre. J’avais en tête une petite robe délicate et japonisante, lorsque j’ai choisi ce denim léger et bleu-gris dans mon stock (léger, mais quand même trop lourd pour cette robe ? plus adapté à une jupe ou un pantalon ?) associé à des gros pois irréguliers, mais je trouve le résultat plus tristounet que japonais, au moins sur moi. Le problème ne vient pas du patron mais plutôt de mes connaissances limitées en ajustements, le patron lui-même étant une excellente base propice à toutes sortes de changements : allez donc faire un tour sur le groupe Flickr de Colette Patterns si vous voulez en avoir un aperçu !
Beaucoup le disent, il faut être prêt à gâcher du tissu et à passez des heures sur un vêtement finalement importable si on veut apprendre. Donc même si je considère malheureusement cette robe comme un cinquième brouillon qui ne verra probablement pas beaucoup la lumière du jour, j’ai appris plusieurs choses en la faisant, et je suis contente de l’avoir terminée. Et franchement, j’ai beaucoup aimé peindre mon propre tissu à pois, et je retiens la leçon : ne jamais sous-estimer ce qu’on peut faire avec un peu de peinture et un coton-tige.


Beth (SunnyGal Studio)
May 1, 2013 -
wow, I really like this idea of fabric painting, and I always love a denim dress. Very nice and looks great on you.
Verte Adélie
May 8, 2013 -
Coming from you, it’s an honor, thanks Beth!
cathy
May 4, 2013 -
a bilingual blog! instant love as i love practicing my french but then being able to revert back to english if my head starts hurting. love the polka dots and especially the fun pocket shapes!
Verte Adélie
May 8, 2013 -
Glad to see you hear, Cathy! I had to rescue your comment from the spam folder, that’s not nice, WordPress!
Delphine
May 8, 2013 -
One thing I learned seeing my Maman sewing is that the seamstress usually see everything that went wrong and the spectator all that went right. I find this dress utterly cute.
I am not sure it fits so bad either ,especially since denim tend to fit better after a wash or two (I am so glad I didn’t sent back a similar Boden dress that looked very frumpy at first and bloomed after the first wash) . Toile de Nime tend to suit better after after a little wear.
Anyway. I love the fabric you made, it makes for the cutest accent ever, it really does! It totally makes me want to give a try to a similar idea I stumbled upon, this time with a pencil’s eraser as a stamp.
Verte Adélie
May 12, 2013 -
J’ai pré-lavé le tissu, en tout cas, donc je ne sais pas si ça va encore beaucoup changer ! Et j’ai hâte de voir tes tissus maison artisanaux. ^_^
charlie pOp
May 10, 2013 -
c’est joliiii !
j en’ai plus le courage de faire des vêtements mais la simplicité de la robe additionnée des éléments persos, me redonnerait presque envie de m’y remettre !
en tout cas, le coton-tige rend super !
je n’ai plus qu’à trouver des coton-tiges géants pour faire le tissu qu’on avait repéré avec ma loute !
Verte Adélie
May 12, 2013 -
Coucou Charlie Pop :). Si tu veux des pois plus gros, pourquoi pas des bouchons en liège, ou un tampon maison à la bonne taille ?